
Shields are a vital part of Minecraft’s gameplay, particularly in active combat. They are helpful because they entirely negate front-facing attacks of four damage or less.
Shields can also deflect incoming attacks, including arrows that backfire and damage the enemy who shot the arrow in the first place.
Additionally, shields negate the non-damage effects of ranged attacks like being set on fire or getting poisoned by an arrow.
Also, there is no knockback from melee attacks when you block attacks with a shield.
However, shields can feel a bit dull at times due to their limited classic looks.
Thankfully, you can create, customize and enhance shields in Minecraft to your liking, and we are here to provide you with some insight regarding that subject.
The Basics
Let’s start with the fundamental part of this tutorial – crafting the shield itself.
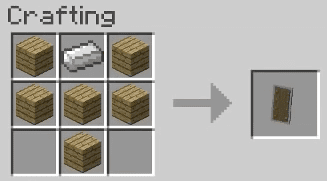
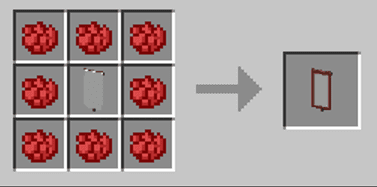
To craft a shield in Minecraft, you need six wood planks and one iron ingot.
You need to Arrange the wood planks into a Y shape in the crafting grid and the position the iron bit on the top area.
Using The Shield
As we’ve mentioned, shields are helpful for a bunch of reasons.
To use a shield, you must first equip it. The best spot to keep your shield in is your off-hand slot.
When the shield is equipped like that, you can rapidly access it via the right-click function in the Java version of the game or the crouch button in Bedrock Edition. That will allow you to block incoming attacks but will also impact your movement speed.
There is one weakness to the shield, as it can’t block axe attacks.
Blows from axes will make the shield go inactive for five seconds, leaving players vulnerable to attacks.
Still, shields are efficient against the following attacks:
- Melee attacks
- Arrows (without the piercing enchantment)
- Fireballs
- Tridents
- Snowballs
- Thorns
- Explosions
- TNT (not ignited by yourself or by a Redstone mechanism)
- Non-magical projectiles
- Guardian/elder guardian lasers
Banners are the core of this tutorial. They are what brings life to the otherwise dull shields. They are made from wool, and the colour of the wool impacts the look of the banner.
Banners can be overlayed on the shield via the crafting grid near the 3×3 grid.
Crafting banners is a simple, straightforward process.
The most difficult part about crafting a banner is settling on a display.
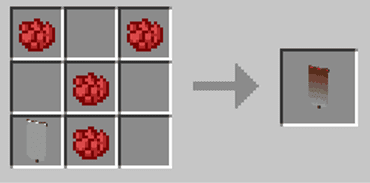
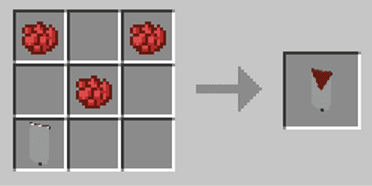
To start working on a banner, you must gather lots of wool and one stick.
Then, you can open the crafting table screen and move the pieces according to your desire, thus forming a pattern.
The stick must be placed in the bottom middle slot, while the top six slots have to be occupied by the wool.
Customizing A Shield
To settle on a design, you have to craft a loom, interact with it and position the banner in the top-left spot, and dye materials in the top-right slot.
That will open a menu with the patterns you can choose from.
You can also manage the dyes around a banner via the crafting table until you discover a pattern that suits your taste the most.
There are numerous patterns you can choose from. These are the most popular ones and how to craft them:
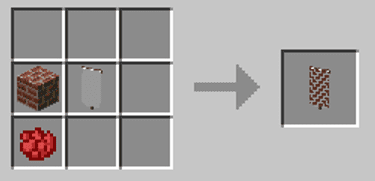
- Brickwork pattern: combine brick block and banner
- Colourful brickwork pattern: combine brick block, dye, and banner
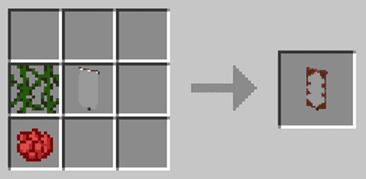
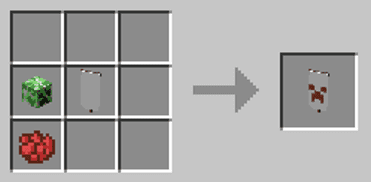
- Fancy border: combine dye, vine, and banner
- Creeper face: combine Creeper head and banner (dye optional)
- Skull and crossbones: combine Wither head and banner
- Flower: combine oxeye daisy and banner
- Mojang logo: combine an enchanted golden apple and banner
Shield designs can be mixed and matched together by layering them over the top of a banner, thus leading to new contraptions and unique combinations.
You can similarly create letters for banners. Unfortunately, space is very scarce, so you will have to be very precise when working on a design.
These designs require numerous materials, which can take a considerable deal of your time.
Spicing Up Your Design
You can form gradients with a pattern of 4 dyes. You can change how the gradient unravels by flipping the pattern around.
You can use various in-game items to create patterns. For example, using a brick block and a banner will lead to a brickwork pattern. You can combine dyes with that pattern to change the colour of the brickwork.
You can form plain borders by placing the banner in the middle and surrounding it with eight dye pieces.
Additionally, you can form an attractive border by merging a banner with a piece of vine.
Placing a dye in the corner of the crafting screen will lead to that corner being coloured on the shield.
Chevrons can be crafted by forming a “>” shape upside down.
You can create a sawtooth pattern by moving the pattern around.
Icons
Icons can be crafted by combining some specific items with banners. For example, using a creeper head block will turn the banner into a creeper face on a white background, which looks outright scary.
However, adding a dye to that combination will change the colour of the creeper’s face (eyes and mouth), making it more… creepy!
Let’s recap the icons you can obtain:
- Creeper head – Creeper face
- Wither Skeleton Skull – Skull And crossbones
- Oxeye daisy – Flower
- Enchanted Golden Apple – Mojang logo
Combining Patterns
The developers put a lot of thought into developing the shield customization options.
Banners can hold up to six patterns, and you can use each pattern as a standalone layer. You can combine layers to form a unique design and show it off to your friends!
We recommend that you try out as many combinations of banners as you can. Finding the perfect design for your beloved shield can take a long time, but be assured that, once you are finished, it’s all going to be extremely rewarding, and you will rapidly agree that it was worth your effort.
You can also play with friends and take a look at what they’ve done, which may possibly inspire you.
The only limit to the possibilities is your imagination.
There is also a trick known by few people that can help you copy a banner.
You don’t have to go through the lengthy process of making a banner from the first layer again if you want to keep the same style.
You can place a blank banner next to the one you want to copy (in the crafting table menu), and the game will take care of the process.
The only condition you have to meet for that to work is that the blank banner must be made out of the same colour of wool.
Enchanting Shields
To enchant a shield in Minecraft, you can use an anvil or even an enchantment table. You can use the following enchantments:
- Curse Of Vanishing – The shield disappears when you die
- Mending – Uses your XP to repair the shield
- Unbreaking – Will increase the shield’s lifespan (durability)
This is it for today. We hope that these tips and tricks will help you bring more colour to your Minecraft experience. Stay tuned for more tutorials!